
More Guest Blogs


Editor’s note: This post is one of a series by Eric Whetzel about the design and construction of his house in Palatine, Illinois, a suburb of Chicago. A list of Eric’s previous posts appears below. For more details and more photos, see Eric’s blog, Kimchi & Kraut.
Once Wojtek and Mark had installed continuous insulation on the exterior side of our ZIP sheathing (4 inches of Rockwool Comfortboard 80), I was able to move inside and begin installing Rockwool Batts (R-23) in our 2×6 wall framing.
After reading up on the available options for insulation, we decided to invest in Rockwool insulation, both the rigid Comfortboard 80 on the exterior of our sheathing and the Rockwool batts for inside our stud bays. Although it was more expensive than other options, particularly the Comfortboard 80, we felt it was worth the added cost.
In particular, by helping our wall assembly to be vapor-permeable (or vapor open), we felt the Rockwool could help mitigate any mistakes, should they be made, in the wall assembly. This being our first build acting as general contractors, we wanted to add some margin for error wherever we could find it.
For environmental reasons, one of our goals was to be as foam free as possible. There’s an increasing awareness about the carbon footprint of our structures, not to mention the total carbon footprint of our daily lives. At any rate, if I had it to do over, I would at least seriously consider using reclaimed rigid foam for the continuous insulation over the sheathing (both for the potential cost savings and its status as a reclaimed material otherwise headed for a landfill), understanding that it does reduce drying potential to the exterior. As others have noted, using reclaimed rigid foam in this way may be the best, or “greenest,” use of foam insulation until the construction industry hopefully moves beyond its use altogether as better options become more viable (e.g. wood fiber insulation).
Here are some resources for reclaimed rigid foam:
https://www.reuseaction.com/sales/foam/
https://www.greeninsulationgroup.com/
https://www.repurposedmaterialsinc.com/polyiso-insulation/
I would also consider using dense-pack cellulose in the 2×6 walls instead of the Rockwool batts if I could find an installer I was reasonably certain could do the work properly. During construction it felt safer to use my own labor to install the Rockwool batts, thus avoiding the possibility of any gaps in the wall insulation. I was hoping to offset the cost of the batts with my free labor, plus I just enjoyed doing the work. Had we gone with the dense-pack cellulose, it would’ve been something I couldn’t do on my own (no equipment or training).
Installing the Rockwool batts is fairly easy and satisfying work. They’re much easier to work with than fiberglass batts, which are horrible on your skin and tend to flop around as you try to get them into place. While the Rockwool also produces some irritating fibers when it’s cut (and requires using a dust mask like fiberglass), I found that a shower easily washed them away. Wearing long sleeves during installation also helps.
Also, the fact that the Rockwool batts have a friction fit means they don’t require any staples or netting to keep them in place. Because of the friction fit, it’s also easy to tear off small pieces to stuff into irregular shaped voids should the need arise.
Like the Comfortboard 80, the batts can have some variation from one piece to another, with a change in density clearly visible. With the Comfortboard 80, this was significant enough that we avoided using the worst pieces, meaning those with the least amount of density (these pieces felt thinner and sometimes even crumbly). Although this inconsistency was still present in the batts, I managed to use almost every piece, saving the least dense pieces for use in some interior walls for sound attenuation (more on this topic below).
Overall, we were happy with the Rockwool batts, and would definitely use them again should dense-pack cellulose not be a viable option. Anyone who’s reasonably handy can install them should they have the time available during construction.

Air sealing details
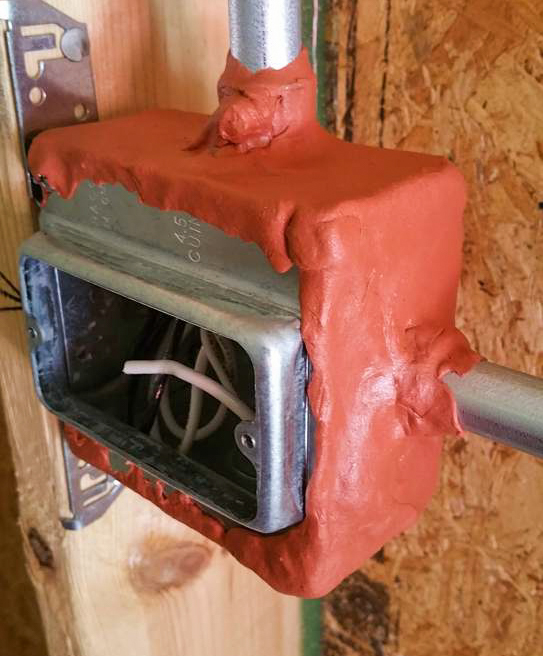
In conjunction with the Intello that would eventually be installed over the 2×6 framing members and the Rockwool batts, we also used Flame Tech putty pads to air seal behind every outlet and light switch box. I had seen them used in a Matt Risinger video for sound attenuation. The other option would’ve been to use airtight junction boxes. Here are a couple of examples: Small Planet Supply and 475HPBS.
I tried to stick with products my subcontractors used every day. But because my electrician wasn’t familiar with airtight junction boxes, I opted instead to come in after he had everything installed and apply the putty pads. I found installing them to be straightforward and pretty quick.
The putty pads are attached to release paper. Once the paper was removed the pads were easy to mold around each outlet and light switch box. Putty Pads are available at Amazon.
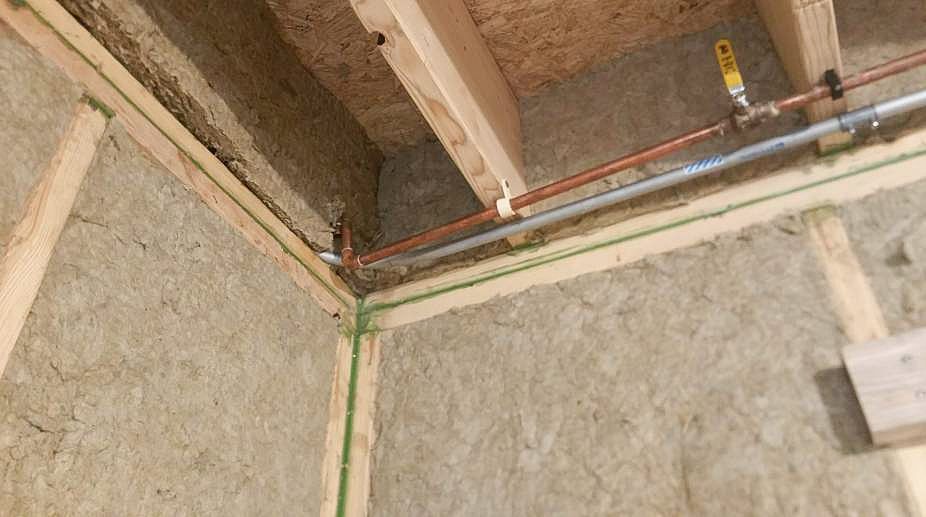
The trickiest area to detail for the walls was at the ceiling and wall junction. In our case, the roof trusses sit on two 2×6s on edge, which in turn sit on top of the wall’s double top plate. The 2×6s create space for our service cavity under the bottom chord of the roof trusses.

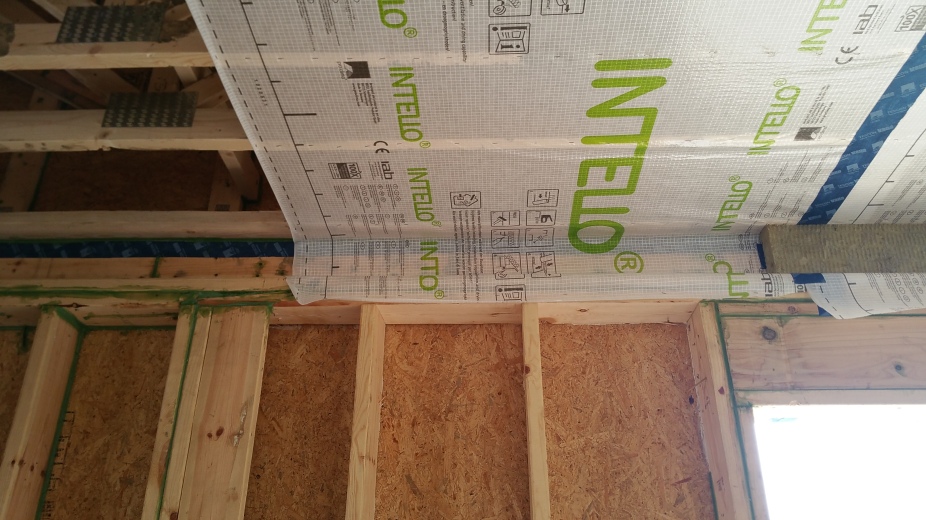
Before cellulose could be blown into the attic, we installed Intello on the bottom chords of the trusses. At all outside edges the Intello was carried from the roof trusses down over the double top plates of the walls. Intello eventually would be installed on the walls, which required a connection point between the Intello on the ceiling and the Intello on the walls.
After the Intello was installed on the ceiling, a service cavity (or service core, or service chase) was created with 2×6s screwed to the bottom chord of the trusses through the Intello.

Before installing the Rockwool batts in the walls, I filled the gap above top of the top plate with leftover pieces of Comfortboard 80. The first piece of Rockwool fit snug inside the gap, while the second piece was attached to the first with some plastic cap nails and the friction supplied by the 2×6s forming the service cavity. Some additional holding power was added at the gable ends with drywall clips from The Nailer.

Even though we used a 12-inch raised-heel roof truss, and we had 4 inches of Rockwool on the exterior of our Zip sheathing, it was important to fill the gap created by the service cavity to make sure our thermal layer was unbroken around the perimeter of the house. The outside edge of the roof truss is also the most vulnerable to ice dams, so having the 4 inches of Rockwool Comfortboard 80 directly below this area where blown-in cellulose would be installed offers some additional thermal performance to the attic insulation.
If I had it to do over, I would go with a 24-inch raised-heel truss, as this would offer not only significantly more R-value in this area (for relatively little expense), it would also make any inspection or repairs in this area much easier to deal with.
As each piece of Rockwool batt was installed, it was important to keep any butt joints between cut pieces tight together. Also, once each piece was snug inside the stud bay I finished by gently fluffing the outside perimeter edges so the Rockwool sat as flush as possible to the studs, thus maximizing their R-value.
Adding a smart vapor retarder
With 4 inches of Rockwool Comfortboard 80 on the exterior of our sheathing, the code would have allowed us to use nothing more than latex paint as our interior vapor retarder (Class III).
Again, to improve our margin for error, I felt like it was worth the added expense and time to install a smart vapor retarder (CertainTeed’s Membrain product would’ve been an alternative for Intello) to avoid potential issues with diffusion in the winter.
When I asked a question on GBA about this issue, the consensus seemed to be that the Intello, although technically unnecessary, was a nice bit of insurance.
It also added a final layer to all of the previous air sealing details. With redundant layers of air sealing, even if small areas experience failure over time, there are still other areas to back it up, thus maintaining our overall air tightness for the long term.
Sealing the Intello to the subfloor was one of my final air-sealing chores. It was deeply gratifying to get to this point, especially since drywall and then flooring were up next.
Thoughts on advanced framing techniques
If I had it to do over, I would use less framing around windows and doors, along with using pocket headers instead of the more traditional insulated headers we ended up with. Pushing the header to the exterior sheathing would mean being able to insulate the pocket on the interior side with Rockwool or dense-pack cellulose, rather than the rigid foam we ended up with (unfortunately, XPS in our case).
Before we had to fire them, the two general contractors we were still working with were unfamiliar with advanced framing techniques, and they were already struggling to comprehend the many Passive House details in the drawings (not to mention many of the conventional details) so, as I’ve noted elsewhere, I had to pick my battles carefully.
Another change I would make would be at points where interior walls meet exterior walls. Rather than using ladder blocking to make the connection, which is still better than more traditional methods (creating a boxed in void that’s virtually impossible to insulate), I would use a metal plate at the top of the walls to make a solid connection. In addition to making drywall installation easier since it would create space between the two intersecting walls for sheets of drywall to be passed through, it would also make installing insulation, especially batt insulation, much more straightforward with clear and easy access (no horizontal blocking to get in the way).
A ProTradeCraft article discusses what builder David Joyce believes is worth doing in terms of advanced framing techniques. Perhaps just as important, he points out what he believes can be safely ignored, or is just not worth doing.
In the Matt Risinger video below, architect Steve Baczek delves into some of the key components he uses to optimize advanced framing techniques.
In addition to the pocket headers, the idea of using header hangers instead of additional jack studs, seems to make a lot of sense.
And here’s a ProTradeCraft video regarding their own take on Advanced Framing:
One final change to our framing would be opting for two-stud corners instead of the California 3-stud corners that we have. Although it represents a relatively small change, I think a two-stud corner is cleaner and allows for slightly more insulation in this vulnerable area.
Clearly, each designer, architect, GC, or framing crew will have their own particular views on advanced framing, so there’s room to make individual choices without undermining the goal of balancing structural integrity with reduced energy demand. Local codes, along with the opinion of your rough framing inspector, also will have to be accounted for. My guess is these techniques will continue to evolve, especially if specific products come to market to aid the process (i.e. reduce the amount of framing lumber required while ideally also lowering labor costs, all without negatively affecting the overall strength of the structure).
Sound attenuation
We designed our home with a smaller than average footprint, incorporating many Not So Big House principles. The main floor is roughly 1500 square feet, with another 1500 square feet in the full basement below. One way to make the floor plan feel larger than it actually is was to provide some sound attenuation in key areas (we incorporated several other techniques to expand the feel of the floor plan that will be discussed in upcoming posts regarding interior design).
For instance, we installed Rockwool in a long partition wall that runs east-west down the center of the house. This wall helps define the barrier between public areas (kitchen and family room) on the south side of the home and the private areas (bathrooms and bedrooms) on the north side.
We could’ve used Rockwool Safe ‘n’ Sound, but at the time it was a special order item in my area, whereas the batts were already in stock.
In the photo below, the Rockwool in the main east-west partition wall is covering the refrigerant and drain line for one of our three Mitsubishi heat pump heads, along with the usual electrical conduit for outlets and light switches.

Although this doesn’t make for a totally soundproof connection between spaces (we weren’t prepared to take things that far), the ability of the Rockwool to muffle sound between rooms significantly is quite impressive and, for us at least, well worth the effort and added expense.
It’s also nice to watch TV in the family room and know that as long as the volume is at a reasonable level you’re not disturbing anyone trying to sleep or read in the two bedrooms. This kind of sound attenuation also adds a level of privacy to the bathrooms while they’re in use.
And, again, it’s not that no sound is transmitted from one room to another, rather it’s almost entirely limited to doorways, thus significantly reducing the overall impact of the noise that is transmitted.
As a result, I would definitely use Rockwool for sound absorption again. In fact, I can’t imagine going without this kind of sound attenuation now that we’ve been able to enjoy it in our new home.
Arguably, addressing this issue of unwanted sound transmission is even more important in Passive Houses or high-performance homes that are already much quieter than conventional homes because of the extensive air sealing and well above code levels of insulation. In our own case, outside noises either disappear entirely or are significantly muffled — this includes a commuter train a couple of blocks away.
Drywall
We went with USG 5/8″ EcoSmart drywall (for more, see this GBA article on EcoSmart). We chose the 5/8-inch over 1/2-inch mainly for added durability and some slight sound deadening between rooms.
I had read about CertainTeed’s AirRenew drywall, but it sounded like the only VOC it absorbed was formaldehyde, which, if I understand the issue correctly, can be safely avoided with the use of appropriate cabinets and furniture. If memory serves, AirRenew works by utilizing a compound similar to triclosan, meaning a biocide, which some believe can have potentially serious health effects. It’s not clear to me, even now, whether the use of AirRenew drywall makes sense, or exactly what compound (or series of compounds) are utilized to absorb the formaldehyde. CertainTeed has remained silent on this point, claiming the information is proprietary. Nevertheless, it has a Declare label, so the International Living Future Institiute must believe it’s reasonably safe to have on painted ceilings and walls.
At any rate, we wouldn’t be bringing in any new furniture that would have elevated levels of VOCs (including flame retardants) once construction was complete. Moreover, by being mindful of every finish we used and product we brought into the house, we’re hoping to maintain a high level of indoor air quality.
The International Living Future Institute’s Red List and database of Declare products were a big help to us, even though we’re not pursuing any kind of certification. The Greenguard certified label was also helpful, in particular when it came time to choose tile and grout.
By consciously choosing every product and material that comes into the home, it’s possible to at least reduce our exposure to harmful VOCs and chemicals. While still imperfect (Who can you trust?), these kinds of programs do allow designers and homeowners to take some control over the environments they’re creating and living in.
Frankly, in a rational system, one that was truly looking out for the best interests of consumers, this kind of research — time consuming and frustrating busy work to put a finer point on it — would be considered laughable if not horrifying. In a rational system it would be safe to assume that any product for sale, apart from some careful instructions on their use and disposal, would be safe to have inside your home. Nevertheless, if unintended health consequences are to be avoided during a renovation or new construction, consumers have little choice but to do the necessary homework (or pay someone else to do it for them) and be as thoughtful as possible with their selection of materials.
Now that all of the elements of our wall assembly were complete, it was time to have some fun with final finishes: flooring, wall colors, wood trim, doors, kitchen cabinets.
Other posts by Eric Whetzel
- Charred Cedar Siding
- Exterior Insulation and a Rainscreen
- The Blower Door Test
- Choosing and Installing a Ductless Minisplit
- Installing an ERV
- Choosing Windows
- Attic Insulation
- Installing an Airtight Attic Hatch
- Air Sealing the Exterior Sheathing
- Installing a Solar Electric System
- Prepping for a Basement Slab
- Building a Service Core
- Air Sealing the Attic Floor
- Ventilation Baffles
- Up on the Roof
- A Light Down Below
- Kneewalls, Subfloor and Exterior Walls
- Let the Framing Begin
- Details for an Insulated Foundation
- The Cedar Siding is Here — Let’s Burn It
- An Introduction to a New Passive House Project
Weekly Newsletter
Get building science and energy efficiency advice, plus special offers, in your inbox.


15 Comments
Curious to know whether the wiring conduit is required in your jurisdiction.
I believe conduit is required by code for all of Illinois, but I don't know for sure (there may be exceptions in more rural parts of Illinois). From personal experience, any time I've seen open walls in Chicago or the suburbs they've always had conduit.
Thanks for this detailed series, lots to learn. I wondered if you could discuss why you used 2x6 on edge for the ceiling service cavity? Was that to facilitate ducts of some sort? Or was the 5.25" or so space needed for something else? Why not something like 2x4 on the flat cris-crossed to allow wires to reach anywhere (I suppose the conduit precludes that anyway!).
Thanks James!
We thought we were going to use the service cavity for both ceiling lights and for the ComfoTubes of our Zehnder ERV. Once the cavity was established, and we started planning out all the cuts necessary to locate all of our supply and exhaust diffusers for the ERV, we realized it was much more straightforward to come up from the basement and end in the first floor walls rather than the ceiling --- far fewer cuts, and significantly shorter runs for the ComfoTubes from the main unit in the basement to all the diffusers on the first floor.
Another advantage to having the diffusers in the walls rather than the ceiling is that you don't need a ladder to clean the filters (assuming you keep their location off the finished floor within reach).
If I had it to do over, I'd go with just a 2x4 cavity for the conduit and junction boxes in the ceiling.
Got it! Yeah, large cuts in all those 2x6s would be a pain. The Comfotubes look great, anyone know if there are equivalents in larger sizes appropriate for kitchen hood ducting?
Eric, thanks for all your blog posts. Your attention to detail is amazing.
I wondered why you used Intello on your ceiling, since you already have a vented attic. Do you really expect to need to dry to the interior space from your attic insulation?
For the cost, I figured you would use simple poly on the ceiling and just use the smart vapour control on the wall system.
Thanks John! We needed to establish an air barrier for the ceiling directly under the roof trusses. We felt like our two main options were either a smart vapor retarder, like Intello or Membrain, or we could've used Zip sheathing (or even plywood). In the end, we felt like the Intello would be easier to install and detail properly.
A side benefit to the service cavity is that it created some distance between the ceiling drywall and the Intello air barrier, making it less likely that the air barrier would be compromised, either during construction or even by some future owner.
I've read about projects going with only an airtight drywall approach for the ceilings, even some Passive House projects, including one by Jake Bruton and Steve Baczek, but I'd be concerned about how long it would remain airtight. And I'd be worried about a future owner installing something on the ceiling and not realizing the ceiling drywall is their air barrier and how important it is to maintain it.
I agree about airtight drywall. I think it is unlikely to last for the life of the rest of the structure. For the effort, some kind of dedicated air/vapor barrier makes sense.
The service cavity is also a good idea. Knowing how many things homeowners hammer into walls/ceilings, having a gap seems like a sensible defence.
My real question was Intello vs poly. Why spend the extra on Intello for the ceiling?
I like the concept of smart vapor control for the walls, but I don't see the reason for adding it to a vented attic. I am happy to be educated, though, if you (or others) have good reasons.
Sorry, John, I should've clarified about the poly.
We were using Passive House projects as models for our build. In all the projects I had come across they seemed to use either the Zip sheathing or a smart vapor retarder as their air barrier for ceilings.
Whether Passive House, or Pretty Good House, or even a more conventional build, it was my understanding that the poly can trap moisture in walls or ceilings. If I understand the issue, it sounds like the poly would only be appropriate in the coldest parts of Canada.
Here's an article from Martin discussing the issue:
https://www.greenbuildingadvisor.com/article/using-interior-poly-as-an-air-barrier
Yes, trapping moisture in walls is an issue worth taking seriously. For a fully vented attic, it is not the same issue. Especially if you have a nicely detailed flat ceiling plane (like yours).
Essentially, you have a perfectly vapor-open system to the outside, with your fluffy cellulose drying to the attic air, and then out your roof vents. With an excellent ceiling air-barrier, you are not contributing any moisture to the cellulose. Where does any moisture come from?
A future roof leak is a possibility, but that is best dried upward, not down into the living space. The only reason I could guess for ceiling intello, is if you do serious AC cooling of your house in a humid summer. Then you might (?) get some sorption of attic (outdoor) humidity on the top of your cold intello. However, with thick cellulose and no air leaks, that seems unlikely to me.
Not that any of this is a criticism! You did an amazing job - I am just interested in the building science behind the decisions...
A problem with most air sealing measures is they are concealed. The beauty of airtight drywall is that it is not. If you can't see any defects there aren't any.
thrifttrust, I guess my concern isn't when the homeowner moves in. It's reasonable to believe drywall at the ceiling can be made airtight when the house is brand new. I just wonder about who will be making periodic inspections for the life of the building, for example, to ensure no cracks develop in the drywall tape where ceilings meet walls.
It's also reasonable to believe that the builder can emphasize to their client how important it is not to mess with the ceiling drywall. It's just hard to believe all the owners who come after, even if they're told, will respect the importance of this air barrier. It's difficult to get homeowners to change their furnace filters on a regular basis, so it's just hard for me to imagine they will refrain from installing something they really want to have on the ceiling (e.g. can lights or track lighting), or that they will do periodic inspections of the drywall on the ceiling looking for damage.
Although it is true all of my air sealing is hidden, using a blower door could verify it's still intact.
Hi Eric
When deciding between certainteed membrain and Intellio, what were the determining factors that made you want to spend quite a bit more money for the intellio?
Stanfo3, If I remember correctly, back in 2016 when I was deciding on products the Membrain was newer, visually it looked less substantial, and I think its range of permeability is slightly less than the Intello.
I think I mention in one of my blog posts that I was also biased towards using the European made products, mainly because they've been used far longer than say the black Zip sheathing or window flashing tape. This attitude was probably unfounded, but I felt like I had only one shot at getting things right so I didn't want to make a choice I would later regret.
Using the Zip sheathing itself, or flashing around my front door with Prosoco Joint and Seam, Fast Flash, and their Air Dam products are examples of exceptions to this rule. But even in these cases, I was pretty much following the lead of Hammer and Hand, since they had used these products on multiple Passive House projects.
It was fun researching the various products for air sealing, and even insulation options, but I can't say I ever had 100% confidence in my choices. Even now, it's easy to second guess these choices, either based on price, performance, or even ease of installation. In the end, I went with products I felt gave me the best balance of all of these factors. But it was never easy.
Thank you sir! I appreciate the input.
Log in or create an account to post a comment.
Sign up Log in