

More Guest Blogs


Editor’s note: This is one in a series of blogs detailing the construction of a net-zero energy house in Point Roberts, Washington, by an owner-builder with relatively little building experience. A list of Matt Bath’s GBA articles can be found at the bottom of this page. You’ll find Matt Bath’s full blog, Saving Sustainably, here. If you want to follow project costs, you can keep an eye on a budget worksheet here.
Not too many people have heard of an ERV (energy-recovery ventilator) or the very similar HRV (heat-recovery ventilator). These machines are relatively new to residential buildings so you would be hard pressed to find one in anything other than a highly efficient house. This is unfortunate because they make a house healthier, more efficient, and more comfortable for the occupants at a very low operating cost (although there is a decent upfront cost).
Houses lose heat in the winter (and gain heat in the summer) mainly through conduction and infiltration. Conduction is the biggest culprit, and fighting it is the reason I designed the house with a ton of insulation in the walls, attic, and under the foundation, and installed windows with very low U-factors.
Infiltration is right behind conduction, though, and it can be responsible for as much as 35% of total heat loss. Fighting infiltration is the reason I will be using a ton of caulk and spray foam to seal any penetration in the walls, attic, or foundation. I also designed the house with both a continuous outer and inner air barrier, and will be running a blower door test as soon as the outer air barrier is complete so I can seal up any flaws I find before covering it.
The vast majority of houses have a major problem with infiltration, and I have even seen plenty of new construction with massive breaches in the air barrier. Most building codes now require blower door testing, but in my area enforcement is nonexistent. The result is that most home buyers pay the price in heating or cooling costs over the lifetime of the house with zero consequences for the builder. The flip side to this is that these average houses are very well ventilated. Air goes in and out through cracks and crevices all day and night.
In a net-zero home with a well designed air barrier, this certainly is not the case. Very little air escapes the house, so it is very important to ensure the house is well ventilated. Many builders don’t like the idea of building a tight house where air can’t escape because, they insist, the house won’t get any fresh air.
Don’t you agree that it makes a little more sense to build the house tight and then ventilate the house properly so that all of the ventilation air is run through a high-quality filter before it comes in? This is where an ERV comes in. It takes stale air from the bathrooms and kitchen and vents it outside, while drawing in fresh air from the outside (after running it through an air filter).
In winter, as the two streams of air pass each other, heat from the outgoing air is passed to the incoming air in a heat exchanger (an ERV exchanges not only heat but also moisture). My ERV (the UltimateAir 200DX RecoupAerator) has a sensible heat recovery efficiency of up to 84%. It also will exchange up to 75% of its moisture and filter out 95% of air particles larger than 1.8 microns. For some perspective, a human hair is 100 microns thick!
The result is a healthier house with comfortable humidity all through the year. When you combine it with excellent insulation, you also get a house that doesn’t need a whole lot of added heat to keep it staying at just the right temperature.
Planning the ductwork
I meticulously planned my electrical and plumbing runs before I submitted my plans to get a building permit. Unfortunately, I had not done likewise with my ductwork. I had planned for a conditioned space in the attic to house the ERV, but hadn’t really figured out how I was going to keep all of the ductwork in conditioned spaces as well.
Installing the ducts in conditioned space reduces the cost of insulating them and makes the system work more efficiently. Most important, it eliminates any potential condensation that could ruin the attic insulation.
However, with my budget design using 8-foot ceilings, there wasn’t a whole lot of headroom to be giving away to duct chases. I eventually settled on a design I believe will work out well without taking away too much headroom. Having said that, if I had it to do over again I would have planned it out ahead of time. I also would have completed the ductwork before electrical because wires are easier to work in and around pipes than the other way around. It is yet another entry in my list of things I have learned!
The first step now in preparing to install the ERV system was to frame the conditioned space in the attic, as shown in the photo below.

The key with attic framing is to maintain separation between the trusses and the top plates of the walls so that the framing doesn’t prevent the trusses from flexing. Trusses are designed to flex as they experience upward and downward forces due to wind and gravity. I attached some 3/4-inch plywood to the bottom chord of the trusses and cut out a code minimum 22×30 opening for the access hatch. (The ERV was small enough to fit through this opening.)
I continued the framing by installing vertical members to support drywall. The truss chords will support the other two sides of drywall, which will run diagonally and form the trapezoidal attic space you can imagine from the photo above.
Best practices for ERVs include exhausting air from bathrooms and the kitchen, and supplying fresh air to bedrooms and the living room. I designed my system to exhaust from four locations, two downstairs and two upstairs. Downstairs exhaust grilles will be in the guest bathroom and the kitchen, and upstairs grilles will be in the master bathroom and the master water closet. I will likewise have four supplies, with two downstairs (in the guest bedroom and dining room), and two upstairs (in the master bedroom and living room). It is my hope that this setup will make for a very well-balanced system.
Sizing the system
Building codes call for 60 cfm (cubic feet of air per minute) to be ventilated continuously in a house this size. But I wanted the option of a boost in the system, so I went with a unit capable of delivering 200 cfm. Boost switches will be located in all four exhaust locations so that after using the toilet any odors will be quickly exhausted, and if there is excess moisture in the air when cooking or showering that can be exhausted as well. The switches are very simple and signal the ERV to operate on boost for a set amount of time. The water closet will be set on a 5-minute boost, and the other exhausts will be set on a 15-minute boost.
The sizing of the ducts can be a very complicated task with a multitude of variables, but for my small, low-power ERV I just followed the manufacturer’s suggestions. For larger systems, you can download Manual D software to calculate the size of the ducts for you.
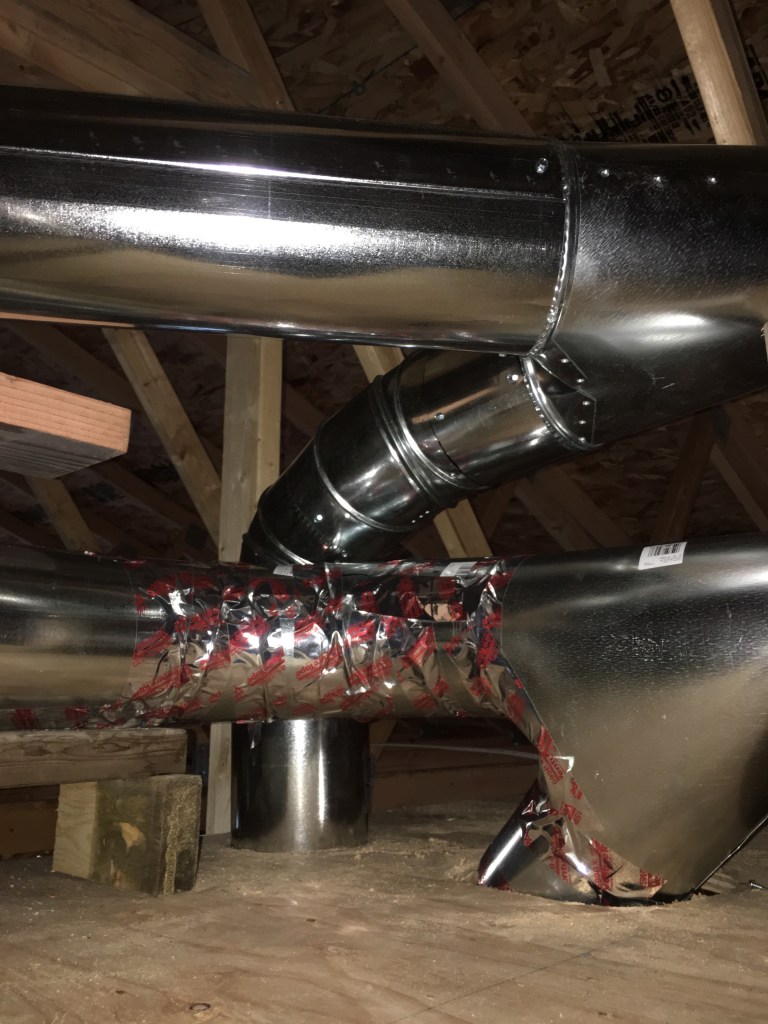
Both supply and exhaust ducts will start at the ERV with a short 6-inch diameter duct before splitting into two more 6-inch ducts. Each of these four ducts will then split as well, so there will be a total of eight 4-inch ducts.
Framing the chases and running the ductwork
The next step was to frame the chases for the ducts. For those not in the know, a chase is a walled-off space for piping or ducts. I used mostly leftover lumber, so it was a really good way to use up scrap pieces and save sustainably.
I decided to add an arch to several of the chases as well. I’m hoping that the esthetics of the arch will take away from the fact that I had to take off a foot of headroom to make room for the chase. Luckily, this only happens in the part of the house between the master bathroom and master closets so I’m hopeful that the headroom will not be missed.
Installing ductwork properly is quite a bit more difficult than running pipes for plumbing or wires for electrical. It is, in fact, so difficult that “more than half of new HVAC systems in U.S. homes do not perform to their rated efficiency as a result of improper installation,” according to the Department of Energy. While many of these problems are due to the popularity of cheap flexible duct, the metal duct I’m using also has several issues. Two of the most common are having sharp turns in the duct runs and not air sealing the ducts properly.
Turns are formed in round, metal duct by using adjustable elbows. The elbows have four asymmetrical rings that swivel so that you can form any bend you desire between 0 and 90 degrees. It is a gloriously intelligent yet simple design. Although they have the ability to make those tight turns, I kept mine to a maximum of 45 degrees with just a few exceptions, and used two of them together anytime I needed to make a 90-degree turn. This will mean smoother airflow inside the duct with less turbulence and will improve the system’s efficiency.
Sealing the ducts can be accomplished either with a UL-rated aluminum duct tape (this is very different than what most people know as duct tape) or mastic, which has the consistency of mayonnaise and hardens like a cast. I mostly used the tape, but there were a couple of areas (where I thought the duct needed strengthening) where I used mastic .
Sealing the ducts is not as important as it would be if they were installed in an unconditioned space. If you have duct leaks in an unconditioned attic, you are allowing air you just heated to escape into the attic. That said, sealing is still important when you install ducts in a conditioned space, because it reduces turbulence and ensures that the exhaust air doesn’t leak back into the house.
Assembling the ducts
I began the installation of the ductwork at the ends of the branches and worked my way back to the ERV. At the end of each branch, I measured the length of straight duct that I needed before the first fitting and added a half an inch. Duct terminations stand out a half-inch ahead of the studs just like electrical boxes. This way, they will end up flush with the 1/2-inch drywall. I used scrap pieces of 1/2-inch plywood and some scrap wire to hold the duct the right distance from the wall.
Straight sections of round metal duct come in rolled sheets that must be snapped together in a zipper-like fashion. They are much easier to cut while they are still flat, however. I hooked the end of my tape measure around the end of the duct and then held a marker at the right distance as I pulled both ends of the tape at the same time around the metal. This is a great way to make a straight line on a curved surface. Then, I held the metal as straight as possible while I cut down the line with some tin snips. Snapping the duct together can be frustrating, but if you keep working at it from both ends it will finally surrender to your will.
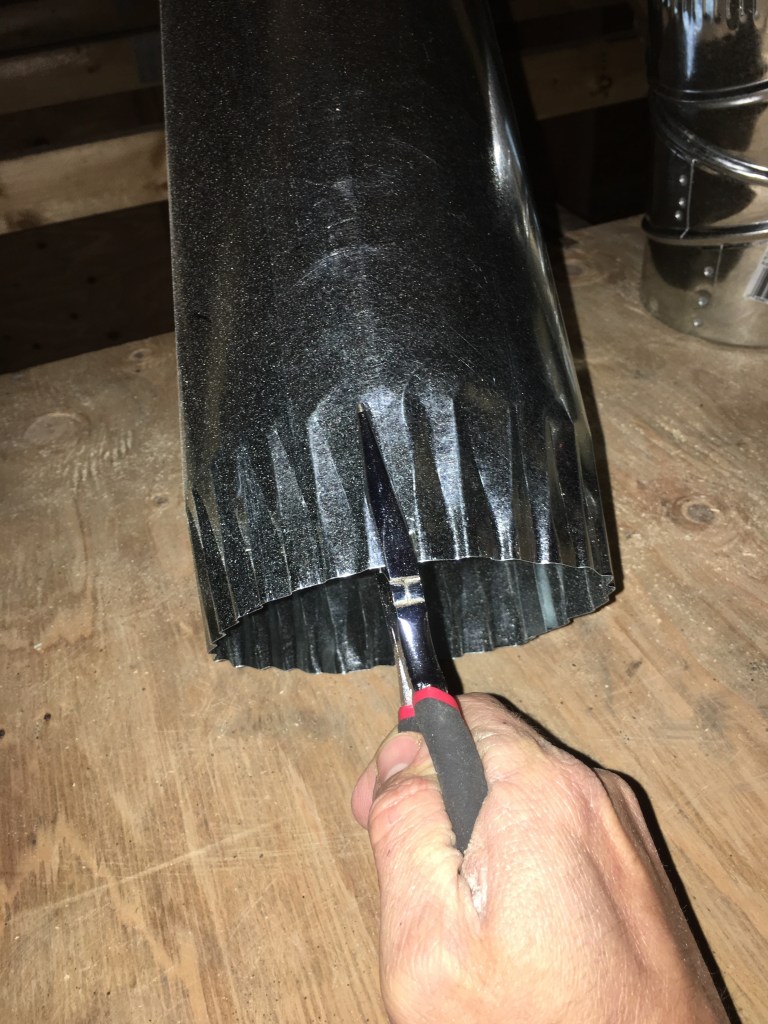
Both the straight sections and the elbows come with one side already crimped. This reduces the diameter so it can fit inside of the piece you are connecting it to. The most efficient way to install the duct is to face the crimped ends in the direction of the airflow, meaning crimped ends towards the ERV in exhaust lines and away from it in supply lines. This will eliminate the added turbulence that would be caused by airflow hitting the crimped edge as it leaves the fitting. For the exhaust terminations, I started with the uncrimped side, but for the supply terminations, I began with the crimped side. Sometimes you need to crimp the end yourself, and this can be accomplished quite easily with a pair of needle-nose pliers, as shown in the photo below.
After dry-fitting each section to make sure it was the right size or angle, I removed it and used tape or mastic along the seam of straight sections and along the seams between the adjustable rings of the elbows. For each section, I used three self-tapping sheet metal screws to secure it to the previous one, and then covered that seam with tape or mastic as well. In the photo below, you can see how the upper duct has been secured with the sheet metal screws, and the screws in the lower duct have been taped over to air seal the seam.
Connecting the outside vents
The last step in installing the ERV was to duct the supply and exhaust to the exterior of the house. The manufacturer recommended using insulated flex duct for this portion of the install, since these ducts will run through unconditioned attic space. One duct will bring fresh air from the outside into the ERV, and the other will remove the stale return air from the ERV to the exterior.
First, I marked the locations for the vents [exterior terminations] and made sure they were a minimum of 6 feet apart, as the manufacturer recommended. You don’t want to exhaust nasty air from the bathrooms only to have it go right back into the supply vent and back into the ERV. I drilled a hole through the wall and fed the vent and attached duct through. I cut a slit in the water-resistant barrier (WRB) and eased the top of the vent underneath. Much like a window, I applied flashing tape to the sides first, and then the top. Finally, I folded the water resistant barrier over the top and secured it with vapor barrier tape. This will ensure that any moisture will flow down and out, and not get behind the hole I made in the WRB.
Back in the attic, I used sheet metal screws to secure butterfly dampers to each of the vents. I faced each of them in opposite directions to ensure that they would allow airflow only in the proper direction. Next, I attached an elbow so the duct was pointed directly at the ERV. It is wise to avoid bends when using flex duct because it creates excessive friction inside the duct. Using the metal elbow ensures a nice, smooth airflow. I cut a piece of flex duct extra long so that the attached insulation would wrap around the elbow, damper, and vent up to the attic wall. It is very important to insulate the duct to eliminate the possibility of water condensing in the attic.
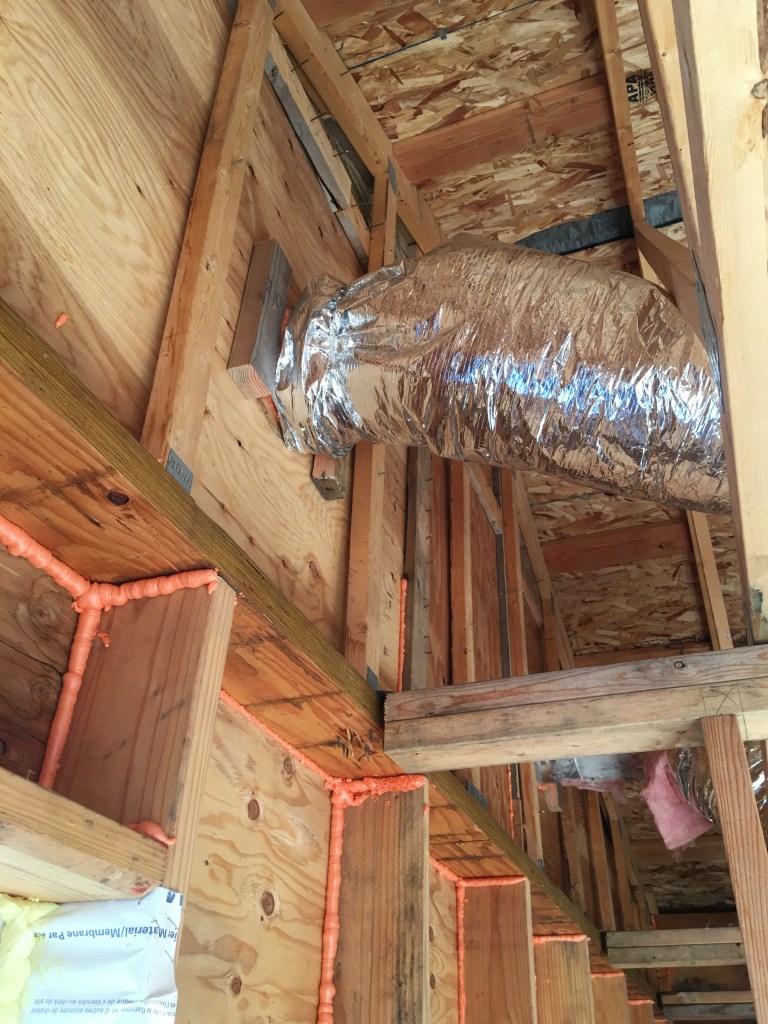
It is really important to stretch flex duct nice and tight, again to reduce friction inside the duct. I secured the flex duct using sheet metal screws, and then much as I did with the metal duct: I taped it with aluminum tape to ensure an airtight seal. Then I pulled the rest of the duct insulation over not only the end of the flex duct, but the metal duct elbow and butterfly damper as well to ensure the entire run was insulated. I used a strip of metal duct under the supporting strap to prevent the fiberglass insulation from compressing.
Adding the boost switches and other controls
The last step in preparing the ERV was to wire the boost switches, main controls, and ‘Econocool’ function. The boost switches are wired with what is commonly known as “thermostat wire.” It is a relatively thin wire and contains two 18-gauge conductors. (Recall that a conductor is a wire that carries electrical current.)
I attached one end of the wire to the control panel of the ERV and ran the other end to the closest boost switch near the master shower. From there I ran another wire to the water closet boost switch and the downstairs bathroom boost switch, and then a wire from the downstairs bathroom to kitchen.
The ‘Econocool’ function is a really nice feature that helps on summer nights when you don’t want any of the heat to be exchanged between the incoming and outgoing air streams. Much like the boost wiring, I used thermostat wire to connect the panel to a switch in the mechanical room. This switch will be flipped in the summer, at which time the ERV will cease to transfer heat when the incoming air is between 55º and 70ºF. This will cool the house faster in the summer evenings, improving efficiency.
Weekly Newsletter
Get building science and energy efficiency advice, plus special offers, in your inbox.


11 Comments
Matt,
Most of us don't use needle-nosed pliers to crimp metal ductwork. We use crimpers. Here is what crimpers look like.
Interesting post, thanks. Based on our past several houses I'd second your suggestions on thorough planning for ventilation ahead of time and on running ducts ahead of pipes and wires.
On a side note: I'm suspicious of the long term durability of the foil tapes so we've started using to some newer stuff that has a mastic adhesive. It's more expensive, but it's a lot easier to apply than traditional mastic in a tub.
Also, some manufacturers have proprietary tube systems that are easier to run than metal and can be purchased separately and adapted for use with other brands of hrv/erv.
If by pipes you mean plumbing pipes, those should still go first. While it may be undesirable for a ventilation duct to bend around something that is in the way, it's literally impossible to do that with drain pipe and maintain the proper slopes and trap lengths.
You will eventually discover that the ERV does nothing to remove toilet odours more rapidly, much in the same way that it does nothing to control the smoke from cooking in the kitchen. There is not nearly enough suction, and the pollutants diffuse into the air too quickly. I learned this the hard way.
The ducts going to the outside need to be insulated even if they are in conditioned space. You can have frost or condensation problems otherwise. I'm pretty sure it's a code requirement.
True when he's divided 200 CFM of boost between 4 locations = 50 CFM per room. If he pulled all of it from one single bathroom then 200 CFM should be sufficient?
@Trevor
In my experience ducts to and from outside are best run ahead of plumbing and electrical. As you point out duct paths to and from rooms are less critical. But in our climate the manufacturer I am familiar with specifies that the exhaust duct should pitch to drain. On a recent project in a truss ceiling I got there last and had to relocate DWV, water lines, and wires to make way for air. So next time we won't that.
If all three are thought out before hand it doesn't make much difference. Run the drains before electrical, and nine times out of ten you have to move the vent stack behind the vanity so the electrician can centre the light fixture over the sink. The main thing it to anticipate the possible conflicts and resolve them before any trade starts drilling holes.
Trevor that would be a bummer. My boost is designed to run at 40 CFM and my master water closet is barely over 100 cubic feet (dropped ceiling for ductwork). I gotta think that it would do a pretty decent job of "clearing the air". Main bathroom is 320 so that will be a bit tougher. Really hoping it is effective, though.
100/40 = 2.5 minutes to do a full air change, however that ignores air mixing. Realistically it might be more like 5 minutes, and that's if you don't open the door. It will certainly clear the air faster than without the boost, but when I read "quickly clear the air", I interpret that as it will be clear by the time you wash your hands and leave the bathroom. I don't think that will be the case.
> "four supplies, with two downstairs (in the guest bedroom and dining room), and two upstairs (in the master bedroom and living room). "
Let's say that you run at the code CFM of 60, it's distributed equally among the 4 supplies and two people sleep in the master bedroom with the door closed (these may not be true in your case, but are certainly true in others). So 7.5 CFM/person in the master bedroom, far short of the 15-20 CFM/person one should have for good quality sleep and odor control.
Is there any evidence that canned spray foam is a reliable long term air sealant? For example, see here (where it evidently wasn't):
https://www.greenbuildingadvisor.com/article/see-stack-is-a-cool-stack-effect-tool
Log in or create an account to post a comment.
Sign up Log in