

More Guest Blogs


Editor’s Note: This post is one of a series by Chris Stratton and Wen Lee, a husband-and-wife team living in the Los Angeles area who are turning their 1963 suburban house into an all-electric, zero-net energy home. They chronicle their attempts at a low-carbon, low-cost, and joyful lifestyle on their blog Frugal Happy. This post was written by Chris.
When considering what materials to use for the interior of the common area, we wanted at least one surface to have some character. Drywall is great in many ways. It’s durable, inexpensive, fire-resistant, versatile, and you can cover walls and ceilings quickly, especially if you know what you’re doing.
But drywall can be a little boring. When discussing this project at the outset with my construction-experienced friend Sunil, I asked him about using tongue-and-groove (T&G) pine paneling for the ceiling, and he suggested the possibility of using reclaimed flooring. At the time I tucked the idea away, since I was then far away from the interior ceiling surface stage and had no ready prospect of where to get reclaimed flooring.
The first step is to salvage the wood
Fast forward a year or so, and it was finally time to think about what to use for the ceiling. Wen asked around and discovered that her friend Henry from high school is now a real estate developer who would soon be gutting a home in a nearby city!
I must say, Wen’s social capital really is incredible. We approached Henry asking if he would be removing the oak floor, and if so, could we salvage it? After checking with his contractor, he very generously agreed to let us take up the old flooring as long we cleaned up after ourselves and didn’t damage the subfloor. Deal!
The salvaging process involved prying up each piece with small pry bars and a mini sledgehammer, assisted occasionally by an oscillating multitool for the more recalcitrant pieces.
After the pieces were removed, all the nails had to be pulled out by hand. My brother-in-law Bin helped a lot with the harvesting. Even Wen came out for a day to do some labor!
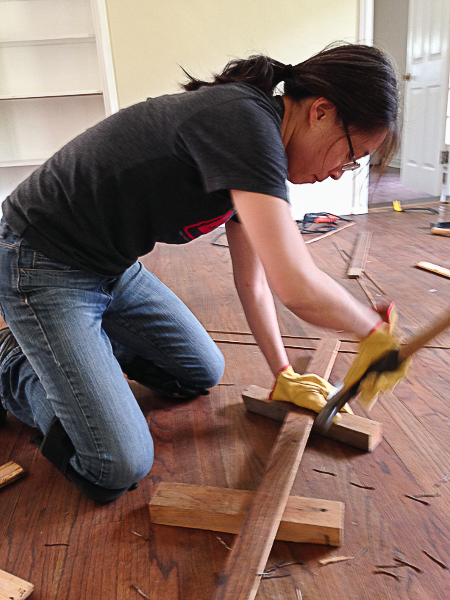
I was very grateful, but was wondering why the developer was taking out a perfectly intact hardwood floor. We soon discovered one possible explanation: cats! In particular, cat pee. Some significant fraction — maybe 20% — of the pieces were saturated with cat urine and emanated its most distinctive odor.
If we wanted our newly renovated ceiling not to smell like cat piss we would need to sort out the offending 20%. And that would have to be done by individually sniffing each redolent piece and determining its fate. Since my sense of smell is considerably better than Wen’s or Bin’s, the tedious olfactory task unenviably fell to me and my soon-saturated nostrils. Ew. [Note: the ceiling has been installed for several months now, and no hint of any cat smell. So “sniff sorting” was successful!]
Estimating quantities
We had to estimate how much wood we would need to cover the ceiling. It was important to have enough, because there would be some time between when we harvested the wood and when it would be used. If we underestimated, it might not be possible to get more wood, because it might not be available.
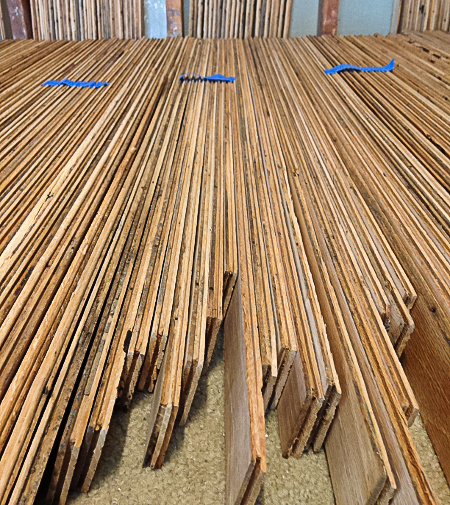
To calculate the amount needed, I measured the area of the ceiling: about 600 square feet. I then determined how much each square foot of T&G flooring weighed: about 1.4 lbs. I then multiplied the two to determine the total weight needed: about 850 lb. I rounded up to 900 lb. to account for losses.
It turns out I should have rounded up even more, to perhaps 1000 lb., but — oh well. The process of salvaging 900 lb. of wood needed took about 10 days spread over the course of three weeks. I almost always had a helper. It was a lot of work!

I weighed the wood in 25-pound bundles, and laid it out, marking each increment with blue masking tape. Soon much of the available floor and interior wall space of our house was covered in T&G flooring laid on end.
Preparing the flooring
Now that we had the wood needed, we had to prep it. I wanted a light-colored ceiling and the flooring was stained a rather dark brown. I decided to remove the top layer of the wood to expose the natural oak color and then pre-finish it (as opposed to finishing it once it’s installed) with a clear varnish.
But how do you efficiently remove the stain on 900 lb. of oak flooring? Any kind of manual sanding or planing would be out of the question. When I was at my friend John’s workshop some weeks earlier, I noticed that he had a self-feeding power planer. This tool came to mind as a potential solution to my problem. I asked John about borrowing his planer and he generously agreed, provided that I return it in the same condition I found it. Deal! Social capital to the rescue, yet again.
By the way, southern California really needs to have a tool library for these kinds of expensive tools. They are really great to have when you need them, but you don’t need them very often and you can’t justify buying them or just can’t afford them. In the Bay Area, we lived between two such tool libraries (one in Oakland, one in Berkeley) and we used them all the time. Tool libraries should be everywhere! If you want to learn how to start your own, watch this video of a webinar that Wen helped organize.
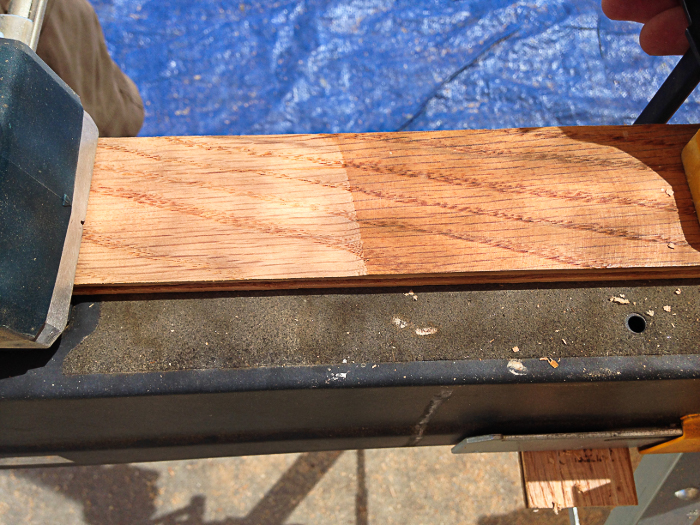
We just fed the brown wood in one end of the planer and it magically came out a light natural oak color from the other.
Even with a fancy planer, planing over 3800 linear feet of flooring took a long time, but it took much less time than it would have using almost any other method.
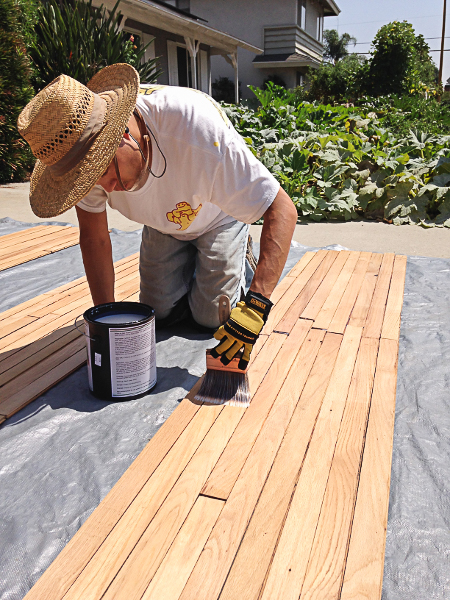
After the flooring was planed, it needed to be varnished. This would be much easier to do before it was up on the ceiling, because gravity would be on our side. We laid the flooring outside on the patio and driveway and brushed on two coats of varnish. We initially tried using a paint sprayer, but the area we could spray at one time didn’t justify it, and we were going through the expensive varnish too quickly, so we just went back to the brush.
Installing the ceiling
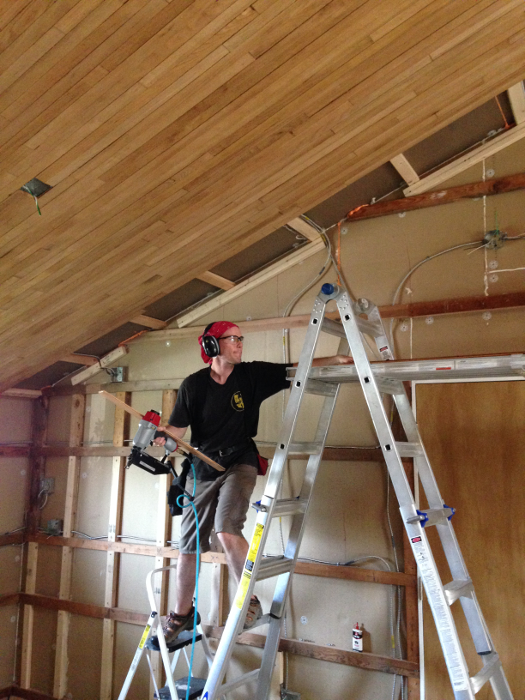
Finally the prep work was done and it was time to begin installing our new oak ceiling. This T&G paneling has to be installed bottom to top, left to right, so that the tongue from the last piece would support the next piece.
At first I tried installing a few partial rows at once in the same area, but soon found that to be unworkable because the lengths of the pieces varied. I ended up taking down those first few partial trial rows and switched instead to installing one complete row — all the way from the wall to the ridge — at a time. This worked much better, so this was how I proceeded from then on, even though it meant constantly moving the ladders and myself as the roof sloped upward.
Each piece of paneling had to be tapped into place with a rubber mallet before being fastened to the 2×3-inch furring strips spaced every 2 feet. I used a pneumatic nailer to drive 16 gauge brads into the corner of the tongues at a 45(ish) degree angle.
The pressure on the air compressor has to be set high enough that the brad head did not protrude at all once driven in, but not so high that the brad went all the way through the paneling. It’s crucial that the brad head not protrude, because it otherwise it will create an unsightly gap for the next row of paneling — and innumerable headaches. If everything goes smoothly, you’ll end up with a gap-less surface with no visible fasteners holding down (er, up) the paneling. This process is called “blind nailing.”
I did a fair amount of the installation alone, but it was noticeably more than twice as fast when I had an assistant because it meant I didn’t have to climb up and down the ladders so often. Bin and our friend Sang helped out a lot with both the varnishing and the installation.
We sorted all the salvaged pieces into four categories, depending on which of the T&G ends were still intact: tops, bottoms, middles, alternates. Each T&G piece is not supported just from the side by the previously installed row, but also from the piece below it. The bottom pieces went next to the walls, the tops went at the ridge, the middles went in between, and the alternate pieces were set aside in case we ran out. [Spoiler: we did run out and had to use them.]
The major downside of the alternate pieces is that they have to end in the middle of a furring strip. The intact pieces (tops, bottoms, middles) can end in between furring strips because the tongue from the piece below supports them (keeping them from moving in and out relative to the plane of the ceiling). But alternate pieces, having neither the tongue nor the groove end intact, have to be supported from behind by one of the 2×3 furring strips. This meant every single alternate piece had to be custom cut to fall in the middle of a furring strip. What a pain in the ass.
Because of several factors — the non-uniformity of the planing, the furring strips perhaps not being perfectly in the same plane, and the difficulty of working overhead — it was impossible to avoid some gaps in the paneling. By necessity, I began to regard these irregularities as a feature, not a bug. “It has character” became our refrain. This layer is not part of the thermal envelope, so it doesn’t have to be airtight, so gaps weren’t a functional problem either. Whether or not gaps are an aesthetic problem depends on your perspective.
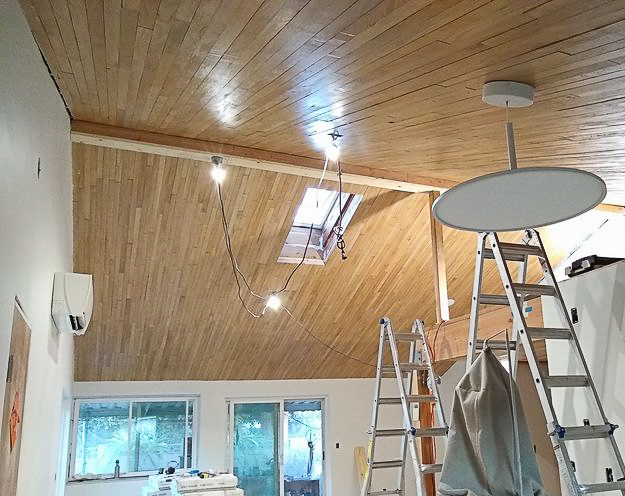
Gradually we started to get the hang of it and slowly the new ceiling began taking shape. Best of all, given the amount of effort involved, it looked pretty good!
Eventually we got into a decent rhythm, and were installing up to 20 or so rows a day by the end. Below is a time lapse video of Sang and me.
Finally we got to the last row and the ceiling was done. It was the end of a long journey. All told, the preparation and installation of the ceiling took about a month. A month!
Conclusions
Was it worth it? I suppose there are differing ways to think about the “worth” of using salvaged oak flooring for our ceiling. I definitely prefer the distinctive look of it to a drywall ceiling. A purchased pine T&G ceiling with wider, longer pieces would have gone up much more quickly and looked more uniform. The smaller, varied pieces of our ceiling give it its character, but they are also what made it so incredibly labor-intensive.
From a broader perspective, surely there is some value to all of us collectively when we are able to repurpose perfectly functional oak flooring that would have otherwise gone to a landfill. The small stand of trees that would have been cut down to supply new paneling can instead keep doing their beautiful thing, regulating temperature, providing habitat, absorbing CO2, and releasing oxygen — in short, helping to keep us and other living creatures alive. A thing that helps keep us alive surely has value, right?
What about from a strictly financial perspective? The price of lower end pre-finished T&G pine paneling is about $3/square foot, including tax and delivery. Our ceiling ended up at around 660 square feet, so materials cost would have been around $2,000. My approximation is that 135 person-hours were spent harvesting sorting, planing, and varnishing the wood. The zero VOC varnish that we used to seal the wood cost about $250. So at $1,750/135 person-hours, our time is valued at about $13/hour. If our time is worth more than that (and it definitely is), then it’s not a great deal. This number would decrease further if I factored in how much less time it would take to cover the same area with uniform 6-inch-wide pieces rather than non-uniform 2-inch-wide pieces.
But, but! We’re not comparing it to a pine ceiling, we’re comparing it to an oak ceiling (something that no one in their right mind would install, but still!). That would make materials closer to $5/square foot, making our labor worth more like $22.50/hour. Still not great, but better. The return would have been marginally better had I used a cheaper varnish.
Another point to consider: now I know how to salvage, prep, and install T&G flooring. What is acquiring that skill worth? In thinking about this I’m reminding myself of the priorities for the project I established at the beginning. The number-one priority was (and is) to learn, and in this case that goal was definitely achieved. I think it’s a beautiful ceiling. I’m glad we did it. I learned a ton in the process of salvaging, prepping, and installing the wood. But one of the things I learned is that I’m not sure if I would do this again. If I did do another salvaged floor-ceiling, at least I now have a good sense of what I’d be getting into.
A footnote
It’s been a few months now since we finished the ceiling, and other progress has been made on the space, including walls that have been sheetrocked and painted. Installing drywall was yet another learning curve for me, but I probably won’t do a dedicated write-up of that process. Suffice it to say that instead of the usual three-stage drywall process, mine was more like five or so. The end result looks fine, it just took me a long time. Noticing a trend?
My great fear that our new ceiling would smell of cat piss has proven mercifully unfounded. And beyond that the end result turned out — dare I say it — lovely. It’s definitely quirky and eye-catching, and it’s nearly always the first thing people comment on when entering the space for the first time. I see its flaws, but I’m happy with it. Not a bad approach for life in general, I suppose.
Other posts by Chris Stratton and Wen Lee
Weekly Newsletter
Get building science and energy efficiency advice, plus special offers, in your inbox.


8 Comments
Chris and Wen,
As a young man, I salvaged a lot of hardwood flooring from demolition sites, and I'm familiar with the routine, including the nail removal process and the need to clean the tongues and grooves of grime. It's a lot of work.
One point I'd like to emphasize for any GBA readers tempted to imitate your ceiling: Anyone who is installing tongue-and-groove boards on the ceiling, whether pine or oak, needs a bulletproof air barrier above the boards.
Thank you, Martin. Once again, I probably should have checked with more experienced old hands before undertaking this myself for the first time. I think more explicit grime removal could have helped with refitting everything back into place. It turned out fine, but yes it was a lot of work.
And yes, please please if I did not make this clear, a tongue-and-groove ceiling should NOT be counted on as part of your air barrier. It's an aesthetic, protective finish surface only.
It's too bad you weren't able to bring in a floor sanding machine to the original location and sand off the finish while the boards were still attached to the floor. Still, a beautiful ceiling.
@Scott, good idea. Sanding off the stain in place at the house where we were salvaging them would have made for a much more uniform finish surface. It wouldn't have been practical for this project -- didn't want to spend longer than necessary at the developer's house, would have to rent floor sander, etc. As it is, fortunately the T&G depth differences are not very noticeable from below and no one's going to trip on them walking on the ceiling. :) Thanks for reading.
Having done my fair share of planing and sanding, I would take the planing any day. I'm not sure what kind of planer you were using, but it's actually a lot easier to get uniform thickness from a planer than from sanding the floor in-situ. It looks like the planer is barely wider than the 2" flooring strips. For a few hundred dollars you could bought a 12" bench planer that would have cut your planing time by a factor of 4 or 5, and given uniform thickness to within a few thousandths of an inch.
Hi Trevor. This version is edited for length, but the full-length version of this article on our blog (http://www.frugalhappy.org/blog/2019/1/28/floor-on-our-ceiling) explains that we did use a bench planer, and it WAS incredibly helpful as a time saver. I can't imagine trying to plane 900 pounds of flooring with a hand planer! The results still weren't uniform, but it wasn't the tool's fault, it was the user's. Thanks for reading.
The finished result looks beautiful!
We've reclaimed a lot of oak strip flooring for use as flooring. We didn't pull the nails out, just cut off the exposed parts with an angle grinder and left the remainder in place. This was pretty quick & easy though made a lot of smoke so we did it outside.
I would have thought spraying the finish would be much faster than a brush; and potentially it could be sprayed once on the ceiling.
Thanks for sharing your project!
David, your way sounds quicker and less finicky. Yes spraying would be much faster than a brush, but applying the varnish wasn't a major bottleneck in the process, so it didn't matter much. I opted for the brush to conserve on the expensive zero-VOC varnish we used and we applied it outside to avoid getting the varnish everywhere inside. But with the proper preparation, spraying inside probably could have worked as well and would have been quicker. Thanks for reading.
Log in or create an account to post a comment.
Sign up Log in