
More Building Science


If a 12-step program is good for helping deal with problems like addictive behaviors, then a 17-step program ought to better, right? Or maybe it’s just a random number that fits the number of tips that popped into my head as I planned this article. In either case, I’ve written a lot about ducts in this space over the past ten years so here’s a little compendium of tips for duct design and installation.
1. Don’t blow air on people
Pretty straightforward here. The heating and cooling system’s purpose is to condition the space so the occupants are comfortable. Air blowing across your skin may feel good in the summer, but in winter it won’t. Put the supply registers in places where they won’t be blowing air directly on people and you can avoid of comfort problems.
2. Slow down the air with bigger ducts
There’s no magic velocity you need to keep the air moving faster than in ducts. When you move it faster, it’s noisier and feels more resistance. Moving it slower keeps things quiet and efficient. But—and this is a really important caveat—you don’t want the air to move too slowly when the ducts are in unconditioned spaces, especially attics. See my articles on the best velocity for moving air through ducts (Part 1 and Part 2) for more details.
3. Use return filter grilles
I like putting the filters in the return grilles for a few reasons. It keeps the return ducts cleaner, it’s often a more accessible place for changing the filters, and it allows you to increase the surface area to keep the filter pressure drop low. (See step 5.)
4. Size all filters the same
We do this in our HVAC designs to make it easier when it comes time to change the filter. The homeowner can order a box of filters, all the same size, and not have to worry about which ones go where. The way you do it is to use the filter sizing rules I gave in an earlier article and then use the largest filter grille size for all of them.
5. Increase filter size
This one goes with the two previous tips. A lot of people think high-efficiency filters, like MERV 13, kill the air flow because of huge pressure drops. That’s true with bad filters and undersized filters. Again, see my filter sizing tips article for more.
6. Provide return air pathways for all bedrooms
Older homes got supply vents but not return vents. We know better now because a closed bedroom door can create big pressure differences inside the house, which can cause problems. You have several options for return air pathways: Put in dedicated returns, use jumper ducts, or install transfer grilles either through the wall or in the door itself. Heck, even door undercuts can work in some situations.
7. Follow the two rules for flex duct
It’s pretty simple:
- Pull the inner liner tight
- Use flex only for straight runs. When you need to turn the air, put in a fitting.
See my Joy of Flex article for more details.
8. Choose better fittings
ACCA’s Manual D for duct design has tables of equivalent lengths for all kinds of duct fittings. Study those tables and avoid the ones with high equivalent lengths whenever possible.
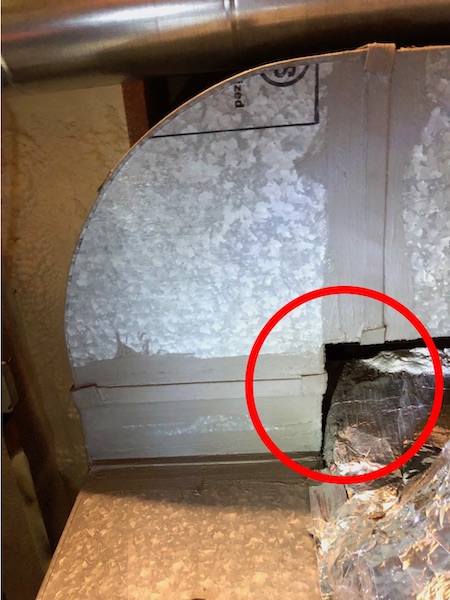
With elbows in particular, pay attention to the throat, which is the inner side of the turn. The photo below is from the duct system that was in my house when I bought it in 2019. That sharp 90-degree throat creates a lot of turbulence, one of the two primary causes of reduced air flow.
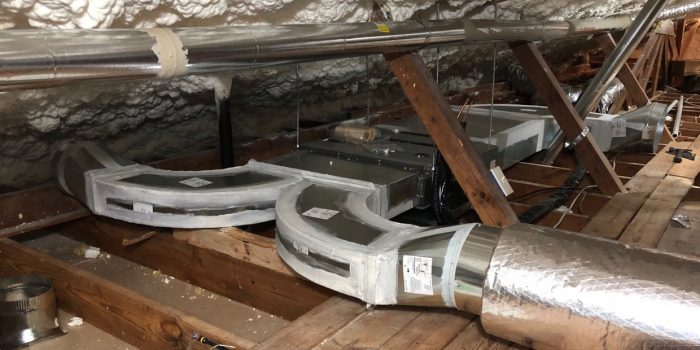
The next photo is part of the new duct system in my house. Notice the smooth radius turns on both sides of the elbows coming off our ducted mini-split air handler.

The general rule for fittings is that you want them to transition as smoothly as possible. Sharp turns or abrupt changes in size add more turbulence.
9. Put the air handler in the middle
If the air handler is in the middle of the house (or zone), the air flow pathway is shorter. And yeah, the fittings are much more important than straight runs of duct in the overall resistance. But when the air handler is all the way on one side of the house, you’re probably going to have more fittings and more straight length.
10. Use a lot of mastic to seal the ducts
Duct leakage is a problem in many houses. In some, it’s a huge problem. Make sure all connections are secure and all joints and seams sealed with mastic, lots of mastic. It’s an inexpensive sealant. And it’s a lot easier to put on ducts when you’re first installing them than later on in the life of the house.

11. Keep the ducts in conditioned space
I’ve been harping on this one for a long time. Ducts in unconditioned spaces cause problems. In attics, they’re exposed to higher than ambient temperatures in summer and nearly as low as ambient in winter. In unconditioned crawl spaces or basements, you get moisture problems in cooling season. In garages, you can suck in bad air and send it inside for the occupants to breathe. It’s well established that ducts in conditioned space perform better.
12. Bury attic ducts deeply in insulation when you can
If you just can’t find a way to get the ducts inside the building enclosure and have to put them in the attic, you can bury them deeply in attic insulation in a dry climate. This is about as good as keeping them inside the conditioned space. And buried ducts are now allowed in the building code (2018 IRC).
13. Avoid condensation in humid climates
In a humid climate, you may be able to bury ducts in the insulation, but it’s riskier. Because of high humidity in a vented attic in a humid climate, it’s possible for ducts buried in insulation to get condensation on the outside of the outer jacket. The 2018 IRC does allow you to bury ducts in attic insulation in humid climates (zones 1A, 2A, & 3A), but you have to use more insulation—R-13 rather than R-8. That doesn’t eliminate all risk, though, because of places where the insulation might be compressed or if there’s duct leakage inside the jacket. If you decide to do this, though, just make sure you understand the risks and do your best to avoid any problems.
Ducts sweat in other situations in humid climates, too—sometimes it’s because of poorly insulated ducts, sometimes it’s duct leakage, sometimes it’s two pieces of flex duct pressing against each other and getting condensation where they touch, sometimes it’s the bottom of a duct sitting on top of attic insulation. Coastal climates are especially subject to this problem.
14. Shorten the ducts by not putting supplies at the perimeter
This one goes with step 9. You don’t need to put the ducts at the perimeter in new homes because we have much better windows. You can shorten the overall duct length and total effective length by not running the supply ducts out to the perimeter.
But that’s not the only advantage! When you put the vents at the perimeter in an attic, it can be very difficult—if not impossible—to insulate the boots. That could mean excess heat gain or loss, higher bills, and potential condensation in humid climates. In vented crawl spaces, you can have the same problems.
15. Take advantage of the Coanda effect
When planning out your supply vents—following step 1 first—use the ceiling. When you blow air from a high sidewall vent placed just under the ceiling, you’ll get some additional help in moving the air across the room compared to blowing the air into open space.
16. Never use bypass ducts
Zoning a single HVAC system so you can control it with multiple thermostats can help sometimes. I prefer to zone with separate systems, but we do occasionally design zoned systems. One thing we never recommend, though, is a bypass duct. At best, it lowers the efficiency of your system. At worst, it can freeze the coil, damage the compressor, or crack the heat exchanger. Just don’t do it.
17. Test the system for static pressure, air flow, duct leakage, and overall performance
Start with good design. Then install using best practices and the tips above. Then test to make sure the system performs as you expect it to. This step is called commissioning and is critical not only to the system you’re testing but also future systems you design and install. You’re likely to find performance problems in your duct systems when you first start testing, and that will help you avoid making the same mistakes in the future.
That’s it. Do these things and your ducts will perform well.
–Allison Bailes of Decatur, Georgia, is a speaker, writer, building science consultant, and the author of the Energy Vanguard Blog. You can follow him on Twitter at @EnergyVanguard. Photos courtesy of the author.
Weekly Newsletter
Get building science and energy efficiency advice, plus special offers, in your inbox.


3 Comments
An explanation of your Tip 16 about not using bypass ducts would be very helpful. We have an electric heat pump HVAC with four thermostats operating four damper controlled zones of the house. The system we have now is our third (the original having been installed in 1994); it's always been four zones. When the second system was installed, a bypass dust was installed, along with additional return ducts. That worked much better. When the third system was installed four years ago, the installer put in a larger diameter bypass duct. The bypass duct is equipped with a counter-weighted pressure balancing damper. We were told the bypass duct was needed in order to balance pressure across the system if only one or two zone dampers were open. Why is this bad? Thanks.
John,
At best, a bypass duct lowers the efficiency and capacity of your heat pump by continually decreasing the temperature change (delta T) across the coil. At worst, it can freeze the coil in summer or damage the compressor. I discussed this problem in greater detail in this article:
The Achilles' Heel of Zoned Duct Systems
https://www.greenbuildingadvisor.com/article/the-achilles-heel-of-zoned-duct-systems
~ Allison
Allison - I designed a passive house outside of Seattle, 4C. All the ducts are within the compete thermal envelope. HVAC installer is saying we need to wrap all the ducts with insulation because of condensation from AC. This seems like overkill to me here in the PNW. Perhaps in extremely warm humid climates this makes since, but our summers that are not all that hot & humid; and doesn't the AC help to bring down the indoor RH. The house is also equipped with an HRV - (perhaps an ERV would be better for this specific situation)? Am I wrong?
Thanks.
-John N
Log in or create an account to post a comment.
Sign up Log in