
More Guest Blogs


We didn’t want to spend a lot of money on basement flooring. We wanted to keep things simple, especially because we weren’t going for a high-end look in that space. The basement is mostly unfinished, at least by traditional standards. We use it for working out, reading, office work, some smaller arts and crafts projects, and miscellaneous storage.
Whatever flooring we came up with had to be durable, if only to avoid having to replace any of it should the basement ever have a problem with water (e.g. from a failed sump pump or a leaky hot water tank).
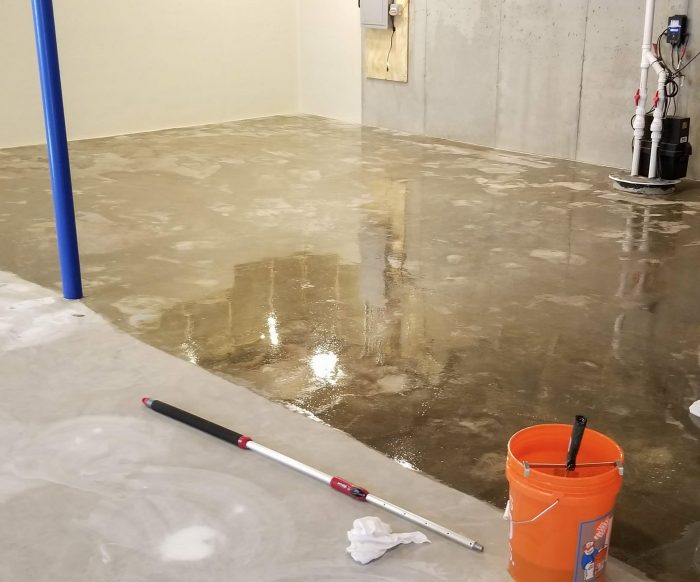
The plan initially was just to seal the floor with tung oil, much like we did for our wood floors. I thought that if I used a slurry mix to patch some surface imperfections in the concrete beforehand that it might produce a pleasant mottled look across the entire floor once it was finished with the tung oil.
Unfortunately, once this patching was done, it quickly became apparent that the look was just messy, if not just boring and forgettable. Even tinting the slurry mix to various shades of blue and green didn’t seem to help at all.
With the patching complete, I went ahead and did the tung oil application just to get rid of the concrete dust on the surface of the basement floor. I applied it the same way I did for the hardwood flooring on the main level. I also broke it up into sections, using the control joints in the concrete slab as a guide.
I knew I’d have several months while other projects were being finished upstairs to figure out another solution.
After almost a year had passed, and with much of the work on the first floor finally complete, it was time to go back and finish up the basement floor.
Jackson Pollock and a beach house tradition
My first thought was to use the painting techniques of Jackson Pollock as an inspiration. After looking through online photo galleries of his work and watching some videos, I realized I’d forgotten just how layered much of his work is.
It was while researching his work that I also came across an East Coast (mainly New York?) beach house tradition of splatter painting floors, done mainly, it seems, to hide the sand and mess brought in from the beach, all while giving the floors some added durability.
We decided we’d try to mimic some of Pollock’s technique, but do it in lighter layers so more of the tung oiled concrete could show through.
Since it was too cold at the time to have Green Building Supply ship me all of the paint required, we decided to take a trip to Madison, Wisconsin, for the weekend to pick up the remainder of what I needed from Premier Paint and Wallpaper.
Premier is a really nice family-owned independent paint store with a wide variety of brands and products. The paint stores around us are exclusively national chains like Sherwin Williams, Benjamin Moore, or PPG. When you walk into these stores you definitely feel the difference compared to a mom and pop operation.
In terms of colors, we decided to stick with the blue we had used for the basement steel beam and columns, along with white as a neutral color, while finishing with a bright green to liven things up a bit. This combination mimics the iconic color scheme used by Kawasaki motorcycles.
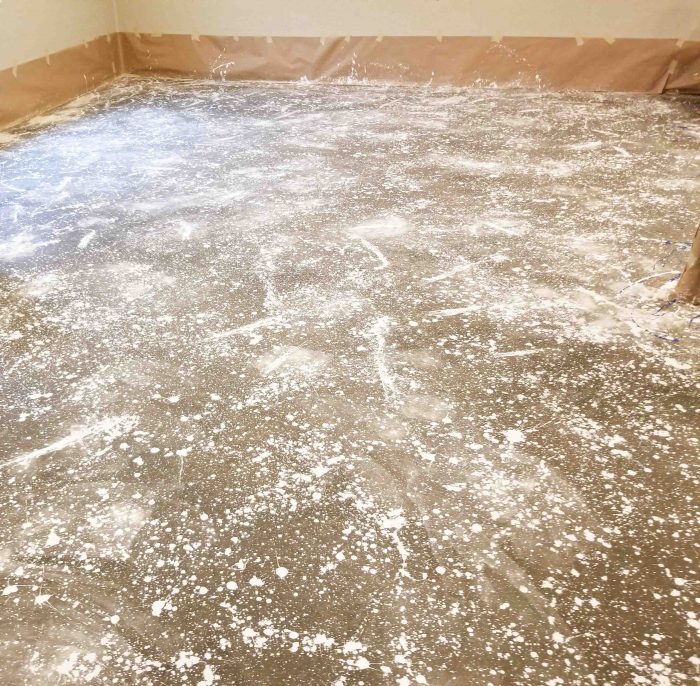
White is the base color
With the walls protected against splatter, my daughter and I started to experiment in the back corner with the white color first. We thought white would be the best option as our base coat color, complementing the now tung oil darkened color of the concrete.
We also took our time to experiment with the other colors, figuring out exactly how we wanted the paint to fall on the concrete—either in droplets or in long, stringy patterns.
Based on this first section, we felt like we could go fairly heavy with the white and still have some of the darker tones of the concrete underneath come through the final finish. In each section we first started with the white to establish a base coat for subsequent applications of blue and then green.
We then played around with how much blue and green we wanted to finish up with on top of the white and the darker concrete underneath.

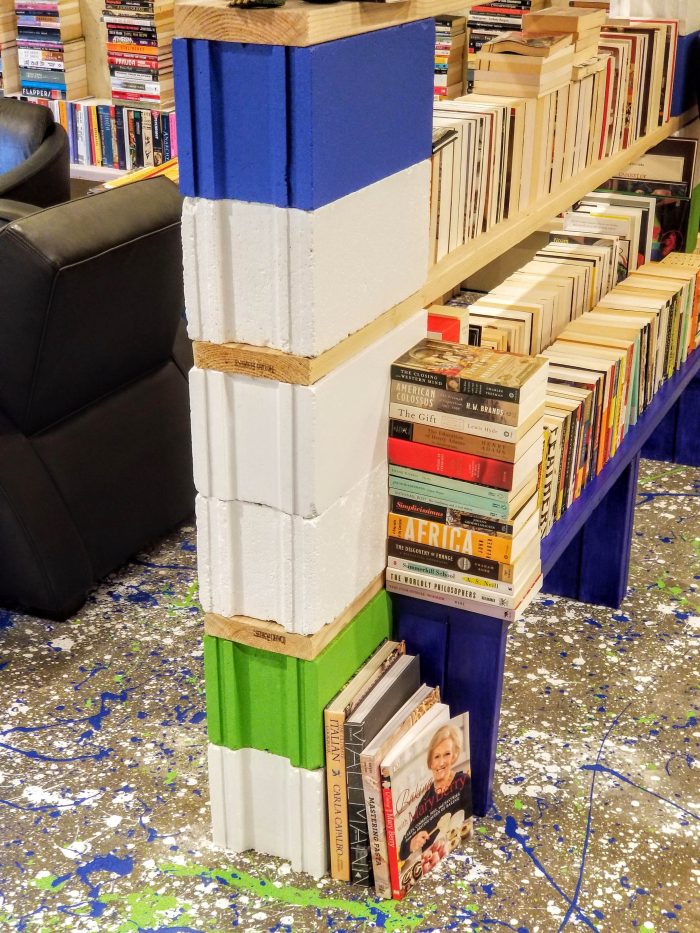
As we finished up a section of floor, we would organize the space more permanently. For one area of books we used the traditional set-up of cinder blocks and wood shelves, but we added some character by taking the time to paint the blocks using the floor colors. We also turned the blocks on their side to hide their empty centers. I had seen this technique used in a YouTube video as a way to dress up this type of shelving normally associated with a college dorm room or one’s first apartment.
It definitely added some time to the project as each block required a couple coats of paint, but it was a nice way for my daughter and I to have some more fun with color, too.
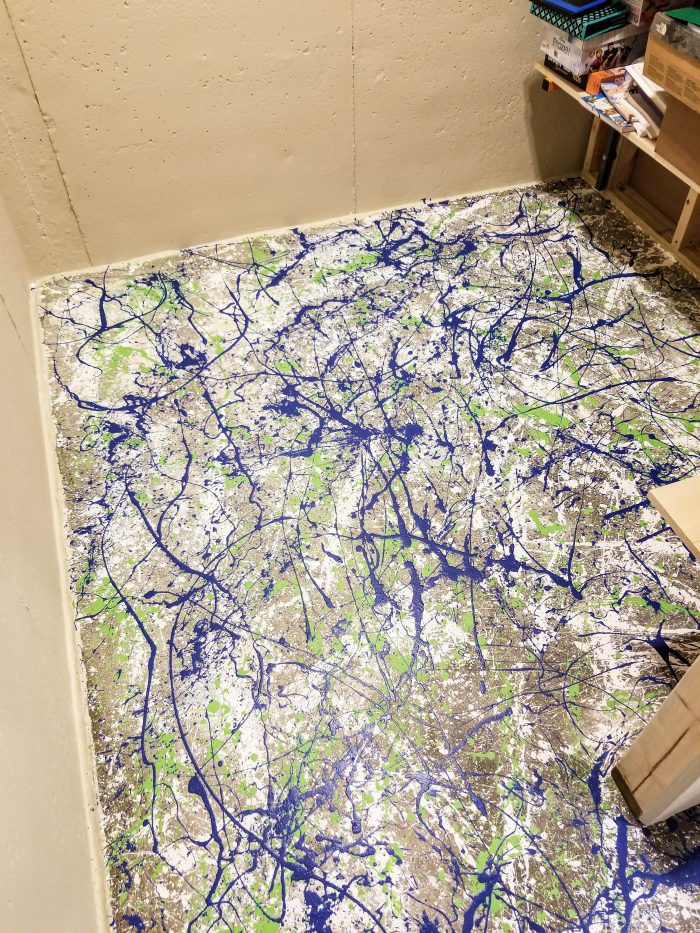
We were pleasantly surprised by the wide variety of looks, textures, and playful randomness in the overall pattern of the paint splatter.
It’s definitely unpredictable to a great degree, but with practice it did become easier to control, and we did develop a feel for how we wanted each area to end up looking.
Once the white paint was applied, we would let it dry overnight. The next day we would come back and apply the blue.
Since each color would have areas of fairly heavy coverage, after the white was down we always applied the blue and green coats in our socks to avoid even the possibility of our shoes pulling up any areas of uncured paint.
We typically gave the blue 24 hours to dry as well, although there were a couple of times where we waited only about 6-8 hours before starting the green. With less paint on the floor, it seemed to take the blue less time to sufficiently dry.
The goal was to apply less paint with each change in color. We definitely wanted the white to remain the main background color, with the blue and the green acting as pops of accent color.
When the floors had only been sealed with the tung oil, although it solved the concrete dust issue, it did make several areas slippery smooth. Because the paint splatter hits the concrete in various thicknesses, the slightly uneven texture this produces helps make the final finish slip resistant. Even with this high build in some spots it’s never been a problem; instead, this texture is pleasant both underfoot or even to the touch.
I was a little worried about the thicker areas of paint drying and curing properly, but apart from some bubbles that popped as the paint dried, and some areas where the paint film shows some wrinkling on the surface, we had no issues in this regard.
In addition to being slip resistant, it was also a relatively inexpensive finish to create, requiring just three gallons of white, two gallons of blue, and a single gallon of the green. This was in addition to the initial tung oil and citrus solvent (around four to five gallons of each) that we had applied to first seal the concrete. For slightly less than a dollar a square foot, the paint splatter technique produces a unique, one of a kind floor finish.
One other key advantage to the paint splatter is that if any part of the floor were to see damage, whether from abrasion or moisture pushing the paint off the concrete, it would be relatively easy to repair with some additional paint applied using the same process.
In terms of technique, we used paint stirring sticks to apply each color.
The paint splatter and tung oil finish has been in place for over a year now. It’s holding up well. The only thing I would do differently is probably try and find a concrete sealer that’s less expensive than the tung oil and citrus solvent combination.
Apart from its relatively easy application and excellent durability, we love the floor finish because it was so much fun to create. While it’s definitely not a formal looking finish, it is a project the whole family could be involved in, regardless of age or ability. And we would gladly do it again if given the chance. We can’t recommend it enough if you’re looking for a fairly inexpensive way to finish a floor in a unique way.
This post is one of a series by Eric Whetzel about the design and construction of his house in Palatine, Illinois, a suburb of Chicago. A list of Eric’s previous posts appears below. For more details and more photos, see Eric’s complete blog, Kimchi & Kraut.
Other posts by Eric Whetzel
- Tile Floors
- Installing Hardwood Flooring
- Completing the Wall Assembly
- Charred Cedar Siding
- Exterior Insulation and a Rainscreen
- The Blower Door Test
- Choosing and Installing a Ductless Minisplit
- Installing an ERV
- Choosing Windows
- Attic Insulation
- Installing an Airtight Attic Hatch
- Air Sealing the Exterior Sheathing
- Installing a Solar Electric System
- Prepping for a Basement Slab
- Building a Service Core
- Air Sealing the Attic Floor
- Ventilation Baffles
- Up on the Roof
- A Light Down Below
- Kneewalls, Subfloor and Exterior Walls
- Let the Framing Begin
- Details for an Insulated Foundation
- The Cedar Siding is Here — Let’s Burn It
- An Introduction to a New Passive House Project
Weekly Newsletter
Get building science and energy efficiency advice, plus special offers, in your inbox.


4 Comments
Good luck if you drop a Lego on that floor.
Yep. We learned the hard way that we have to corral our daughter's Legos in a corner of the basement.
Even on our main level with hardwood flooring and tile in the kitchen it's typically a foot that 'finds' any stray pieces.
Sprinkle the blocks around each night to discourage intruders.
That floor is a lot of fun!
☺︎ Thanks Malcolm!
Log in or create an account to post a comment.
Sign up Log in